Your Complete Guide To Batch Plotting Drawings In AutoCAD

Batch Plotting. The quickest way to simplify your printing process. Today’s post is highly detailed and includes step-by-step instructions for batch plotting like a pro using AutoCAD.
What is Batch Plotting?
It's a function within AutoCAD that allows you to effortlessly and consistently print multiple drawings (.dwgs) to PDF all at once and in a very short amount of time!
We’ve all been there - it’s the end of the day and you’ve just received a transmittal for 100 native drawings without their published PDF counterpart.
You need to notify your team of the updated drawings, but it’ll take you hours to manually print each CAD file to PDF and you also want to complete this task before you pack up and go home for the day. Luckily, there’s an easy solution: AutoCAD’s Batch Plot function.
Let’s get to it, but feel free to jump ahead to any of these sections:
Working Folder
First things first. We need to set up a folder to keep all your documents organized. A working folder is simply a folder you intend to delete once you’ve completed all steps required to complete a task. It allows you to gather and sort information in one easily accessible location. I would recommend you create this folder somewhere on your network drive and not on your desktop. It’s easier to recover lost information from a network location or restore previous versions of a document if accidentally modified or deleted. Those 100 native files you just received? You’ll want to download and save them there.
Page Setups
In a perfect world, drawings would be returned to you utilizing the same page setup for each file. That’s rarely the case. So, before you start printing them off, you need to establish a set of printing “rules” (AKA the page setup) so that AutoCAD prints them exactly how you want them. Some of these options include paper size, orientation, plot area, and plot styles (colour and lineweight options).
Page Setup Manager Dialog Box
Okay, you’re ready to get down to business. Open the first native file in your working folder and type “PAGESETUP” in the command line. You can also right-click the Model tab or Layout tab and click “Page Setup Manager” to open the dialogue box.

Note: if some of your drawings have their title block created in model space, while others have the title block made in the layout tab, you’ll need to create two different page setups; one for each and run two separate batch plotting operations.
Creating a New Page Setup
Go ahead and click the “New” button and type in a name for your new setup. I usually name mine “Batch Plot-Model” or “Batch Plot-Layout”. You have the option to choose an existing page setup as a starting point, or my preference, start from scratch by selecting <None>. Click “OK” to proceed.

Page Setup Dialog Box
Now we get to define how we want each model space or layout space drawing to print. The options highlighted in the below image are my standard preferences for batch plotting 11x17 black and white (monochrome) drawings. Feel free to play around with the options and then hit the “Preview” button each time to see how it changes the appearance of your soon-to-be PDF.

Once you’re happy with the settings, click “OK”. To apply this setup to the current drawing, click “Set Current”. You’ve just created the page setup you’ll use for the remainder of the drawings in your working folder! But before we move on, make sure you save the CAD file but don’t close it.
Have a standard plot configuration you use all the time?
Learn how to Save Time and Energy with AutoCAD Page Setups in this blog post!
Batch Plotting
With the native file open, type "PUBLISH" in the AutoCAD command line to open the Publish Dialogue Box.

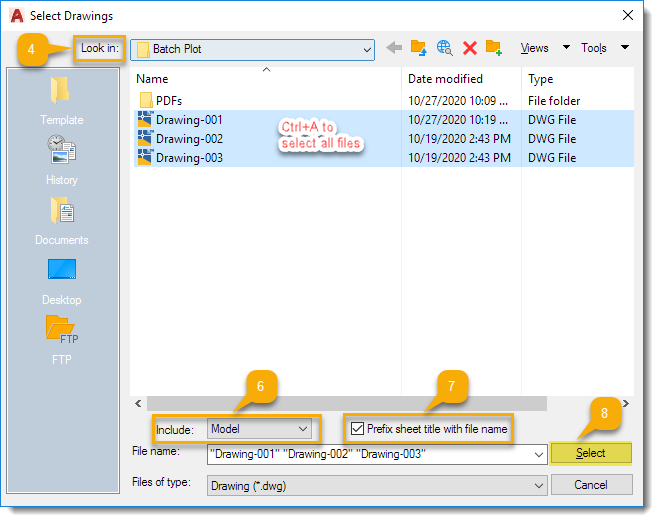
Each number below corresponds to a number in the yellow bubbles shown on the above screenshots.
Ensure “Publish to:” has “Plotter named in page setup” selected.
Choose a folder location to save the generated PDFs to by selecting the More Options (…) button.
Click the “Add Sheets” icon to add the remaining natives from your working folder.
Navigate to your working folder in the Look in: drop-down menu
Select all natives by clicking a file then pressing Ctrl+A on your keyboard.
Choose the preferred Model or Layout tab from the Include: Drop-down menu.
Note: If you have drawings created in both tabs, you’ll need to perform this operation again once the first batch is plotted.
Click to add a checkmark in the “Prefix sheet title with file name” box.
Click Select. You’ll now see all natives listed with their various setups indicated in the Page Setup column (highlighted yellow in the first screenshot), including the new one you just created.
Click a drawing from the list and press Ctrl+A to select all files.
In the Page Setup column, click the drop-down menu on the top drawing. Select the new page setup you just created. This will assign that setup to all files in the list.
Click Publish.
This action could take a while depending on how many files you are trying to plot. So if it looks frozen, just give it a minute to process before clicking elsewhere. A pop-up window will appear telling you the job is publishing in the background. You can close this window.
To see the plot job's status, hover over the print queue icon in the application status bar (lower, right-hand corner).
Quality Check
You’ll notice the new PDFs in your working folder will have either “-Model” or “-Layout” in the PDF filenames (or the description of those tabs if you’ve changed the tab defaults in AutoCAD). You’ll need to manually delete this additional text from each filename so that it only reflects the drawing number.
Spot-check some of the PDFs (or better yet, review all of them) to ensure the drawings have plotted correctly using the correct Model or Layout tab and that all drawing contents are correctly displayed and re-plot any drawings that have errors.
Done!
So there you have it. You’ve completed what could have been a lengthy task before day’s end, distributed the updated drawings to your team, all while proving what an all-star document controller you really are.
Are you looking for Document Control Training?
Check out my Online Signature Course to learn how to turn document chaos into control!
Found this post helpful?
Don’t forget to pin it for later or share this post to help our community grow!